 Sign In
 Create Account
for anyone whos done the swap, did you remove the trans while dropping the engine in, bolting it back on from underneath. or is the easiest method to just drop in as a whole assembly?

B16 Swap Question
Started by crxmobber, May 03 2006 10:01 PM
25 replies to this topic
#1
 Posted 03 May 2006 - 10:01 PM
-
- Mobbin Clean
-

- Group: Contributing Member
- Location:Lake Stevens, WA
-
Drives: 87 CRX Si, 85 CRX Si, 98 prelude, 5th Gen VFR, WRX
-
Image Gallery
 Back to top
#2
Posted 04 May 2006 - 01:52 AM
-
- Spoool'n
-
- Group: Contributing Member
- Location:Las Vegas
-
Drives: 86 Si
-
Image Gallery
 View Garage
I did it many times........easiest way, as long as you have a cherry picker.......is to come from top, bring it down by the brake booster....and tilt the tranny under the frame.
This is without any of the mounts on.....besides the rear, without the bracket.
That was the easiest ive found, and ive taken the motor in and out of this thing about 7-8 times.
A few other tips.....have the alt alternator the way against the block....have the intake mani on for sure, but the exhaust has to be put on after
hope that helped a little

#3
Posted 04 May 2006 - 01:04 PM
-
- Mobbin Clean
-
- Group: Contributing Member
- Location:Lake Stevens, WA
-
Drives: 87 CRX Si, 85 CRX Si, 98 prelude, 5th Gen VFR, WRX
-
Image Gallery
yes that does help thanks. also how far in do you have to hit the side frame rail so that the alt doesnt hit. i want to figure this out before i attempt to drop it in.
SportInjectedClub
#4
Posted 04 May 2006 - 01:25 PM
-
- Project CI2-VIC Team Lead
-
- Group: 2012 Contributor
- Location:Eastern NC
-
Drives: 16 Ford RS, 84 Civic 2000S (B20Z2), 98 Civic EX
-
Image Gallery
View Garage
QUOTE (crxmobber @ May 4 2006, 01:04 PM)
yes that does help thanks. also how far in do you have to hit the side frame rail so that the alt doesnt hit. i want to figure this out before i attempt to drop it in.
I too could use a bit more detail on this then I've found so far. Some good before/after pics would be helpful.
Screech
------------------------
16 Ford RS (2.3l, DS)
84 Civic 2000S (B20Z2 2.0l, SMF)
#5
Posted 07 May 2006 - 07:01 PM
-
- Mobbin Clean
-
- Group: Contributing Member
- Location:Lake Stevens, WA
-
Drives: 87 CRX Si, 85 CRX Si, 98 prelude, 5th Gen VFR, WRX
-
Image Gallery
#6
Posted 07 May 2006 - 07:19 PM
-

- Some days it isn't worth gnawing thru the leather straps
-
- Group: 2010 Contributing Member
- Location:S.E. Wisconsin
-
Drives: '91 CRX si, '66 Datsun SPL311, '87 CRX turbo under construction
QUOTE (Screech @ May 4 2006, 01:25 PM)
QUOTE (crxmobber @ May 4 2006, 01:04 PM)
yes that does help thanks. also how far in do you have to hit the side frame rail so that the alt doesnt hit. i want to figure this out before i attempt to drop it in.
I too could use a bit more detail on this then I've found so far. Some good before/after pics would be helpful.
I did the swap with a cherry picker - tranny attached. No problem. You'll figure out how to tilt the engine when you get it on the hoist.
As for the bump on the frame rail. I used a good size short-handled sledge hammer. I bumped the rail in waay past the point I figured the dent needed to be. With the engine in the car, I've got maybe...1/4" of clearance! That's enough with the "hard" engine mounts. Sorry no picture of the bump. It would be hard to see in a picture. Let me measure exactly where the clearance problem is, so you can bump in exactly the right spot...I'll post a picture tomorrow with a ruler laid out on the frame rail.
#7
Posted 07 May 2006 - 07:31 PM
-

- Too Many Projects
-
- Group: Members
- Location:Hermiston Oregon
-
Drives: 86 Honda CRX Si with B16A, 92 Honda Civic Hatch With a GSR, 87 V8 4Runner, 72 Chevy Pickup SWB
through the top with a cherry picker with tranny on its easy thats how i did it in the first two cars then i just got done using are lift and putting it in through the bottom that real nice if you got the lift
B18C Power One Of These Days
1/4 Mile Times With B16A This Summer For Sure!!!
1/4 Mile Times With B16A This Summer For Sure!!!
#8
Posted 07 May 2006 - 09:24 PM
-

- In the left lane
-
- Group: Members
- Location:Bakersfield, CA
-
Drives: 07 Honda Fit
We always brought the motor in from the bottom, with the tranny on.
Basically, get the motor through the bottom, then bolt up the tranny mount, and use it as a hinge, and lift and bolt up the other mounts. Never used a cherry picker or crane. Just hand lifted it.
Basically, get the motor through the bottom, then bolt up the tranny mount, and use it as a hinge, and lift and bolt up the other mounts. Never used a cherry picker or crane. Just hand lifted it.
Above all else, my WIFE I f33r the most!
Roses are #FF0000; Violets are #0000FF;

RIP 86 CRX DX B16A
Roses are #FF0000; Violets are #0000FF;
RIP 86 CRX DX B16A
#9
Posted 07 May 2006 - 09:48 PM
-
- corvette contender
-
- Group: Contributing Mod
- Location:Hanover Pennsylvania
-
Drives: your car if i find the keys
-
Image Gallery
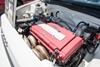
i put mine in through the top with transmission connected. it's easiest to drop it in this way without the altenator on the engine because of mastercylindar clearance but have fun putting the altenator on after the engine is bolted in (lots easier if the intake manifold is not on the engine). it can be done with the altenator bolted to engine but it takes some sweet talking (*lots of vulger language*) and manouvering.
here is a pic of my altenator clearance and frame dent that i just now took for you. not a great pic cause it's dark outside right now but......

here is a pic of my altenator clearance and frame dent that i just now took for you. not a great pic cause it's dark outside right now but......
When I die, i want to go asleep peaceful.......... not screaming and freaking out like everyone else in the car
"i left the bar a little after you and ended up flipping my car in the arbys drive thru"
IM A LOSER!!! my car pulls harder when spinning than any "highly modified" EW

Team BUrnOUt founding member
"i left the bar a little after you and ended up flipping my car in the arbys drive thru"
QUOTE (cbstdscott @ Dec 10 2008, 03:27 PM) <{POST_SNAPBACK}>
Another loser who can not get traction. I feel sorry for him.
IM A LOSER!!! my car pulls harder when spinning than any "highly modified" EW
Team BUrnOUt founding member
#10
Posted 07 May 2006 - 10:51 PM
-
- Mobbin Clean
-
- Group: Contributing Member
- Location:Lake Stevens, WA
-
Drives: 87 CRX Si, 85 CRX Si, 98 prelude, 5th Gen VFR, WRX
-
Image Gallery
cool, thanks for the picture. now i know the general area i need to pound in. hopefully i'll get started on this sometime this week. i'll keep posting and let everyone know how it's coming. 
SportInjectedClub
#11
Posted 07 May 2006 - 11:01 PM
-

- Easily Amused....
-
- Group: 2009 Contributing Member
- Location:Riverside, CA
-
Drives: Look at the Name
-
Image Gallery
QUOTE (crxmobber @ May 7 2006, 08:51 PM)
cool, thanks for the picture. now i know the general area i need to pound in.
this is just too easy


#12
Posted 08 May 2006 - 11:10 AM
-
- Some days it isn't worth gnawing thru the leather straps
-
- Group: 2010 Contributing Member
- Location:S.E. Wisconsin
-
Drives: '91 CRX si, '66 Datsun SPL311, '87 CRX turbo under construction
EDIT: I posted a slightly better picture. (Refresh your browser if you don't see the new picture.) The tape moved about 1/4" to the left, so instead of the end of the pulley being at l3 1/4" it is now shown at 13". Still, you get an idea of where to bang. When I said there was about a 1/4" of clearance between the frame and pulley, I lied. Looks more like 1/16" - but that works just fine. Haven't ground off any of the paint in 8,000 hard miles
Well, before I could figure out how to force my camera to fire the flash, the batteries went dead (as usual). So, this is the best I could do on the pictures. I'll replace these pics with better ones when my batteries recharge.
First picture shows where edge of tape was placed - right below the bolt hole for the engine mount.

Second one attemps to show where the clearance problem is. The pulley is at the closest point to the frame at the 13 1/4" mark on the tape. This is where you need to have a good size dent in the frame.

The pulley extends back from the 13 1/4" mark to about 10 3/4". The area to concentrate denting is around 10 1/4" to 13 3/4". The really critical area is between 13 3/4" and 11 1/4".
I'd suggest putting some masking tape on the top of the frame rail to mark the dent spots.
Well, before I could figure out how to force my camera to fire the flash, the batteries went dead (as usual). So, this is the best I could do on the pictures. I'll replace these pics with better ones when my batteries recharge.
First picture shows where edge of tape was placed - right below the bolt hole for the engine mount.
Second one attemps to show where the clearance problem is. The pulley is at the closest point to the frame at the 13 1/4" mark on the tape. This is where you need to have a good size dent in the frame.
The pulley extends back from the 13 1/4" mark to about 10 3/4". The area to concentrate denting is around 10 1/4" to 13 3/4". The really critical area is between 13 3/4" and 11 1/4".
I'd suggest putting some masking tape on the top of the frame rail to mark the dent spots.
Edited by myheadhertz, 08 May 2006 - 01:37 PM.
#13
Posted 08 May 2006 - 11:24 AM
-
- Project CI2-VIC Team Lead
-
- Group: 2012 Contributor
- Location:Eastern NC
-
Drives: 16 Ford RS, 84 Civic 2000S (B20Z2), 98 Civic EX
-
Image Gallery
View Garage
QUOTE (myheadhertz @ May 8 2006, 11:10 AM)
Well, before I could figure out how to force my camera to fire the flash, the batteries went dead (as usual). So, this is the best I could do on the pictures. I'll replace these pics with better ones when my batteries recharge.
First picture shows where edge of tape was placed - right below the bolt hole for the engine mount.
[image removed incase it starts working]
Second one attemps to show where the clearance problem is. The pulley is at the closest point to the frame at the 13 1/4" mark on the tape. This is where you need to have a good size dent in the frame.
[image removed incase it starts working]
The pulley extends back from the 13 1/4" mark to about 10 3/4". The area to concentrate denting is around 10 1/4" to 13 3/4". The really critical area is between 13 3/4" and 11 1/4".
I'd suggest putting some masking tape on the top of the frame rail to mark the dent spots.
All I got are little red Xs. While I was looking for an X marks the spot picture these are not helping
Would you be able to email them or host them else where?
#14
Posted 08 May 2006 - 11:29 AM
-
- Some days it isn't worth gnawing thru the leather straps
-
- Group: 2010 Contributing Member
- Location:S.E. Wisconsin
-
Drives: '91 CRX si, '66 Datsun SPL311, '87 CRX turbo under construction
All I got are little red Xs. While I was looking for an X marks the spot picture these are not helping Would you be able to email them or host them else where?
My server place is having some problems. The pictures should be back up later.
Would you be able to email them or host them else where?My server place is having some problems. The pictures should be back up later.
#15
Posted 08 May 2006 - 10:52 PM
-
- In the left lane
-
- Group: Members
- Location:Bakersfield, CA
-
Drives: 07 Honda Fit
Took a torch, and a 10 pound hammer to put a good dent into the frame for the right amount of clearance for the altenator.
Also, see if you can get ahold of a 00 Si shifter linkage and modify it to work. Not a whole lot of work to get this to work. Now I use 00 SI shifters from B&M, with the B&M ajuster (which would be easy to make).
Also, see if you can get ahold of a 00 Si shifter linkage and modify it to work. Not a whole lot of work to get this to work. Now I use 00 SI shifters from B&M, with the B&M ajuster (which would be easy to make).
Above all else, my WIFE I f33r the most!
Roses are #FF0000; Violets are #0000FF;
RIP 86 CRX DX B16A
Roses are #FF0000; Violets are #0000FF;
RIP 86 CRX DX B16A


Community Forum Software by IP.Board
Licensed to: Red Pepper Racing